HTML Introduction
HTML Element
The HTML element is everything from the start tag to the end tag
<tagname> Content here... </tagname> Root element
root element เป็น tag ที่ทุกไฟล์ HTML ต้องมีจะเริ่มต้นด้วย tag <html> และจบด้วย tag </html> ส่วนภายใน tag จะเก็บส่วน <body> element เอาไว้.
Example
<html>
.
.
.
</html>
Body element
body element ทำหน้าที่บอกว่าส่วนภายในแท็กเป็นส่วนของเนื้อหาจะเริ่มต้นด้วย tag <body> และจบด้วย tag </body> ส่วนภายใน body element จะเก็บ element ได้อีกสองประเภทคือ <h1> และ <p>.
Example
<html>
<body>
.
.
.
</body>
</html>
Heading element
<h1> element คือแท็กที่เอาไว้เก็บข้อมูลที่เป็นหัวข้อเรื่อง(Heading)จะเริ่มต้นด้วย tag <h1> และจบด้วย tag </h1> โดยเราสามารถทำการเปลี่ยนตัวเลขหลังตัว h ได้โดยตัวเลขยิ่งน้อยก็จะยิ่งทำให้หัวข้อมีขนาดตัวอักษารที่ใหญ่ขึ้นและสีเข้มขึ้น
Example
<html>
<body>
<h1> -text- </h1>
.
.
</body>
</html>
Solution
-text-
Paragraph element
<p> element คือแท็กที่เอาไว้เก็บข้อมูลที่เป็นส่วนเนื้อหาที่ไม่ได้ต้องการการเน้นข้อความเหมือนหัวข้อเรื่องจะเริ่มต้นด้วย <p> และจบด้วย tag </p>
Example
<html>
<body>
<p> -text- </p>
.
.
</body>
</html>
Solution
-text-
HTML Attribute
-HTML elements ทุกอันสามารถมี attributes ได้
The href Attribute
<a> tag ทำหน้าที่เก็บลิ้ง URL ตามที่ผู้ใช้ต้องการได้
Example
<html>
<body>
<a href="https://kantinun.github.io/">Visit my website</a>
.
.
</body>
</html>
Solution
Visit my website
The src Attribute
<img> tag ทำให้เราสามารถใส่รูปภาพบนหน้าเว็บของเราได้โดยที่ src attribute จะทำหน้าที่เก็บ path ของรูปภาพที่เราต้องการนำมาแสดง
โดยที่เรามีวิธีการในการใส่ path ให้แก่ src attribute ได้ 2 รูปแบบ <img src = "URL your image"> Example
<html>
<body>
<img src="https://i.pinimg.com/564x/65/35/f2/6535f2813897442d48b3d0031d27e45b.jpg">
.
.
</body>
</html>
Solution
2. Relative URL - ใส่ชื่อรูปภาพซึ่งต้องมีรูปภาพอยู่ในเครื่องหรือ server ที่เก็บข้อมูลหน้าเว็บไซต์ไว้
<img src = "your image name.jpg"> Example
<html>
<body>
<img src="meow.jpg">
.
.
</body>
</html>
Solution
The width and height Attributes
<img> tag สามารถเก็บ width และ height attributes ซึ่งจะทำหน้าที่ในการกำหนดขนาดรูปภาพที่นำมาแสดงบนหน้าเว็บไซต์เรา
Example
<html>
<body>
<img src="https://i.pinimg.com/564x/a3/4f/c1/a34fc1cd2917e507d940b1bf570fa42d.jpg" width="150" height="200">
.
.
</body>
</html>
Solution
JavaScript Introduction
What is JavaScript can do in HTML ?
1. JavaScript สามารถเปลี่ยนเนื้อหาใน element
How to use JavaScript in HTML ?
การที่เราจะใช้ code JavaScript ใน HTML นั้นเราจะใส่ code ภายใน tag
<script> ..Code.. </script>
โดยที่เราสามารถใส่ tag <script> ไว้ใน tag <head> หรือ <body> ก็ได้
Example
<html>
<script>
.
.
Code
.
.
</script>
</html>
Function
JavaScript Function คือกลุ่มของ code JavaScript ที่จะทำงานก็ต่อเมื่อมีการเรียกใช้
Example
<html>
Function functionname() {
.
.
code
.
.
}
</html>
JavaScript Display Possibilities
1.ใช้คำสั่ง innerHTML - เป็น Method ที่ทำหน้าที่เปลี่ยนข้อมูลของ element นั้น
document.getElementById(element ID).innerHTML = ...content... Example
<html>
<body>
<p id = "demo"></p>
<button type="button" onclick="document.getElementById('demo').innerHTML = 'Hello JavaScript'">Try it</button>
</body>
</html>
Solution
Try it
2.ใช้คำสั่ง document.write() - เป็น Method ที่จะแสดงข้อมูลตามที่เราป้อนให้
document.write(..content..); Example
<html>
<body>
<button type="button" onclick="document.write('Hello JavaScript')">Try it</button>
</body>
</html>
Solution
Try it
***warning*** ถ้าหากเราเรียกใช้ Method document.write() หลังจากที่หน้า HTML โหลดเสร็จแล้วหน้าเว็บไซต์ที่โหลดมาจะถูกลบและแสดงเฉพาะผลลัพธ์ของ Method ***warning***
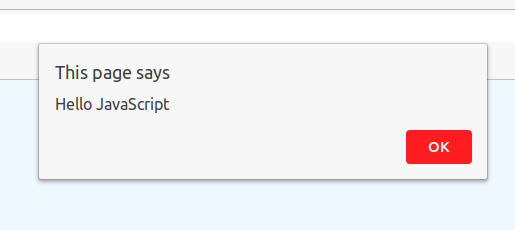
3.ใช้คำสั่ง window.alert() - จะแสดงข้อมูลบนกล่องแจ้งเตือนของหน้าเว็บ browser
window.alert(..content..); Example
<html>
<script>
window.alert("Hello JavaScript");
</script>
</html>
Solution
4.ใช้คำสั่ง console.log() - จะแสดงข้อมูลที่เราป้อนอยู่ใน console
console.log(..content..); Example
<html>
<script>
console.log("Hello JavaScript");
</script>
</html>
Solution
**วิธีการเปิด console ให้ทำการกด f12 และเลือกหมวด console**
JavaScript print
คำสั่ง Print() สามารถทำการปริ้นข้อมูลที่อยู่บนหน้าต่างได้
window.print(); Example
<html>
<body>
<button onclick="window.print()">Print this page</button>
</body>
</html>
Solution
Print this page
JavaScript Statements
JavaScript Statements ประกอบด้วย Values, Operators, Expressions, Keywords และ Comments
Example
var x, y, z; // Statement 1